I'm still new to wire wrapping anything but I've been dying to make some stud earrings. The chandelier style is awesome but I need some change every once in a while. These adorable earrings were a great start to wire wrapping, sort of like dipping your toe in the pool before jumping in. Just creating the 90 degree angle for the stud was challenging enough - I kept holding it too tightly and bending it backwards and sideways and all over the place! The loops on this pair are a little wonky but the sapphire fire polished beads are so pretty that I wore them anyway. I have 5 other colors with and without AB finishes. These sweet little gems will be debuting at the Ybor Saturday Market - Come out and see them sparkle!
Showing posts with label How I Wore It. Show all posts
Monday, October 8, 2012
Monday, October 24, 2011
DIY - Sewn Fall - Butterick Dress
The short version of this Butterick pattern is a great addition to my wardrobe and looks perfect with footless tights or cowboy boots. I love the pleats on the bodice, but it's a little too low cut for the office so I layered it with a tank for modesty. This fabric I used for my first version is a thick cotton with stretch, so with all the gathering under the bodice I looked super preggo. So I ripped off the skirt, and cut off about 1/4 of the width (I measured under my bust and multiplied by 1.5 to get the right width). I also decided to add a thin band to make the waist more fitted.
I threw a short cardigan over the shoulders and a sparkly necklace for work. The length was perfect for some slouchy calf-length suede boots. The pockets in the front were pretty useful and super cute. I think when I make this one again I'll put pockets in the side seams instead of as patches. I'll also use a silkier fabric which might make the gathers fall better so I can nix the waistband. Some darts had to be added to the bust which was pretty annoying since it is lined but I know for next time. I think I wil cut the smaller size bodice but leave the waist measurement so the cups actually fit me.
This is an incredibly easy pattern that can be altered into tons of different styles. I will definitely be making this one again, maybe shortened so I can pair it with leggings once it gets cooler out. I found this to be a great one day project - my favorite kind!
Tuesday, October 18, 2011
DIY - Sewn Fall - Vogue Blouse
Vogue V1261 Alice + Olivia Misses' Tunics
This top (the view in grey) was incredibly simple and took no time at all. If I had any extra knit in my stash I would have whipped up several more copies. With only 4 seams and a neck binding I was able to put this together faster than an episode of The Tudors. I cut out the pattern for all views, and I'm pretty sure the green one is my next project...I'm not too keen on that collar...
This is how I wore it to work today. I love the back! It's so flowy and shiny in this crinkled fabric and very light and comfy. When weather permits I'm going to break out the knit pants and boots (It's Florida, leave me alone) to better balance out the fullness of the blouse.
This is my new necklace, I had to show it off! Its a large silver chain with a delicate black and gold chain threaded through the links. Don't worry that's not real bone, it's porcelain, but it is a great look for Fall. I have a few inches of these chains left and I think a matching bracelet might be in order.
I love this pattern but I wish I had bought the package with size medium instead of large. There is just sooooo much fullness that I lose my waistline, but that is a price I'm willing to pay for comfy-ness. The neckline is also a little wide but I think the green sweater will fit better and then I can Frankenstein the 2 patterns for a perfect fit! I serged/rolled the hem and the sleeves. I tried to hem the sleeves but ended up putting holes in this delicate fabric by stretching as I was sewing. These sleeves are actually 2" shorter than the pattern now... I like the rolled edge for the hem because it allows it to flow a little softer, where an actual hem might have weighed it down too much.
PS - I think Vogue patterns are on sale at Joann's Oct 27-29 for $3.99 - I would definitely snatch this one up!
PPS - McCall's patterns are on sale for 99c Oct 16-22 and Butterick's for $1.99 Oct 27-29. Had to share!Wednesday, July 27, 2011
DIY - Skirt Restyle (100th Post!!!)
I found this skirt at the Salvation Army for a great price of $3!! I LOVE any kind of abstract/tribal print so even though it is 2 sizes too large for me I grabbed it. The colors are vibrant and the fabric has a little stretch to it. Definitely not a natural fiber but I'll overlook that for this print. I did wear the skirt to work one day just to make sure I didn't want to keep it as is. Yeah, that shape is not flattering on me. I was ready to cut it up!
This is a mini skirt I bought at Cotton On a few weeks ago. I am obsessed with it and wear it every weekend. I especially love the oversized front pockets. So I drew out the skirt (yellow paper) and measured every seam length. I transfered this to a paper pattern. It was releatively simple since everything (except the pockets) is a straight line, so I didn't have to actually trace the skirt. *When I get a moment, I'll show you clearer photos of the pattern in case you want to attempt this particular skirt.*
The next step was to measure how much fabric there actually was in this skirt. Roughly 4 feet thanks to all those pleats :) I cut the waistband off, separating the outer fabric from the teal lining (that I really should use for another skirt!). I then Ironed the pleats out of my thrifted fabric.
Now that the fabric is nice and pressed, I cut out each pattern piece (2 front/backs, 4 sides, 2 pockets). I had just enough fabric and I was really hoping I didn't mess up and this point. I left the hem of the original skirt to save me some time, and it really helped figure out top and bottom once the pieces were cut out. I used a scrap of fabric as make-shift bias tape for the top of the pockets. I LOVE how this came out. Then sandwiched the pocket between the front and side front, pinning then sewing.
Here's a clearer photo of the sandwiching. Don't forget to sew the bottom of the pockets closed! Pin and sew the back to the side back pieces. Finally, sew the back to the front at the side seams. Press all seams as you're sewing, this makes for cleaner lines and less mistakes because you're not rushing through every seam. I also did a serged seam finish down each seam in case the mystery fabric decided to fray next time I washed it.
Here's the skirt in its 2D state, all sewn together. Let's take one more look at those awesome pockets! I cut a piece of 2" wide elastic (mostly because I ran out of fabric and couldn't make a waistband) that seemed like a good fit around my waist/hips/where ever I decide to wear the skirt. I measure the waistband in quarters and mark with pins. This helps when stretching and sewing as I can line up the next pin with the side seam or center-front of the skirt. Press your gathers down and you have a beautiful mini skirt with beautiful pockets and a super comfy waistband!
PS This was my 100th Post and I am so excited to have been doing this for a year! I hope you enjoy all my rambling and whining and sometimes good content! :D
Friday, June 17, 2011
DIY - Pencil Skirt (quick) Tutorial
This is a quick overview to putting together a quick and perfect and comfy and sexy knit pencil skirt. Unfortunately I couldn't give you a real tutorial because I am fresh out of knit fabric (tear!). I even had to cut up a Tshirt for lining fabric!
The pattern in pretty simple to draw up. Measure around waist, hips and thighs (where ever you want the hem to fall) and divide each of these by 4. The pattern piece is going to be used for the front and back and will be cut on the fold for perfectly symmetrical pieces. No need to add seam allowance as you want the knit pulled tightly over you.
For example:
My measurements were – waist 36”, hips 40”, thighs 32”. So when I drew my pattern piece I started with a straight vertical line measuring 18”. This is the length from my waist to midthigh. At the top of that line I drew a horizontal line measure 9” (1/4 waist) and at the bottom an 8” line (1/4 thighs). About 1/3 of the way from the top line I drew a 10” line for my hips. Now just connect the lines in a nicely curved manner. The straight vertical line is your center front (or back) and the sloping line is your side seam. Cut 2 of these from the fashion fabric and 2 from the lining. I lined mine because the knit was very thin and I was worried about feeling too exposed.
The waist band is just a rectangle the length of your ¼ waist measurement and 3” tall. Cut 2 of these from the fashion fabric and 2 from the lining.
Now that you’ve got this all cut out, time to sew! See the pink lines for stitching guidance. Instructions use ½” seam allowance.
Place the waistband fashion fabric right sides together and stitch down the side seams. Repeat for the lining.
Place the skirt fashion fabric right sides together and stitch down the side seams. Repeat for the lining.
Pin the waistband fashion fabric inside the waistband lining, right sides together, matching the side seams. Sew across the top of the waistband. Turn waistband right side out and press.
Pin the skirt fashion fabric inside the skirt lining, right sides together, matching the side seams. Sew around the hem of the skirt. Turn skirt right side out and press hem flat.
To finish, pin waistband to skirt, right sides together. Sew through all 4 layers. Finish seam with serger or leave raw, this is your only visible seam allowance.
See! Easy! I love this skirt. When I stock up on knits again I will definitely be re-creating this one.
**Notes**
*Next time I will make the waistband 1-2" smaller than the skirt because I definitely needed that belt to keep it from sliding down. Maybe some extra-wide elastic to go in the casing or instead of the waistband.
*Definitely press between steps! This creates nice straight and flat seams and everything will fit together better as you go.
Sunday, April 17, 2011
DIY - Tunic pattern that I lost
First of all - This entire project was a STASHBUSTER! I used scraps and remnants only :D

I'd love to give you a DIY review on this pattern but I found it on some obscure spanish pattern site similar to Burda Style after a tedious search through message boards. Who knew a simple "free tunic pattern" would be so impossible to find!!?? Anyways there were no instructions (which would have been in spanish anyway) or seam allowances, so it was pretty much like starting from nothing. I measured around my bust and waist and added inches in just these areas to grade the pattern to my size. I also made it 2" longer.
The fabric I had in mind was cut at 1/4 yard so I couldn't cut the front out on the fold and there is a pretty awesome center front seam going on. The front fabric is sheer and I hate layering in the summer so I just added another layer of black knit under the front. I made this an inch shorter than the top fabric so it flowed perfectly in the summer breeze. The blue knit fabric in the back was also too small of a piece and you can see where I seamed it together at the shoulders, but I think it adds interest and I really like the top stitching. You can see the pattern alterations and my super chic french seam below.
I needed to cover up this seam that skewed the print asap. You know I'm obsessed with ruffles but I figured there was enough going on with this little tank and giant ruffles would just be over-kill. I took some leftover blue ribbon from my quilt project and randomly pleated it. This was stitched down the center front, perfectly straight of course, to cover the seam. I think it ties everything together nicely and gives me the pop of color I'm always craving.
Check out how I wore it before rushing out to go bowling...
(PS for some reason I design all my tops to go with skinny jeans even though I only own 1 pair of them)
Belted and all chic-like:
Flowy and casual...look how casual I can stand!
In the end I will definitely be making this one again. I already have other fabric lined up...maybe some like linen...and maybe a button placket down the front for a blousier look for work. Excited!
I'd love to give you a DIY review on this pattern but I found it on some obscure spanish pattern site similar to Burda Style after a tedious search through message boards. Who knew a simple "free tunic pattern" would be so impossible to find!!?? Anyways there were no instructions (which would have been in spanish anyway) or seam allowances, so it was pretty much like starting from nothing. I measured around my bust and waist and added inches in just these areas to grade the pattern to my size. I also made it 2" longer.
The fabric I had in mind was cut at 1/4 yard so I couldn't cut the front out on the fold and there is a pretty awesome center front seam going on. The front fabric is sheer and I hate layering in the summer so I just added another layer of black knit under the front. I made this an inch shorter than the top fabric so it flowed perfectly in the summer breeze. The blue knit fabric in the back was also too small of a piece and you can see where I seamed it together at the shoulders, but I think it adds interest and I really like the top stitching. You can see the pattern alterations and my super chic french seam below.
I needed to cover up this seam that skewed the print asap. You know I'm obsessed with ruffles but I figured there was enough going on with this little tank and giant ruffles would just be over-kill. I took some leftover blue ribbon from my quilt project and randomly pleated it. This was stitched down the center front, perfectly straight of course, to cover the seam. I think it ties everything together nicely and gives me the pop of color I'm always craving.
Check out how I wore it before rushing out to go bowling...
(PS for some reason I design all my tops to go with skinny jeans even though I only own 1 pair of them)
Belted and all chic-like:
Flowy and casual...look how casual I can stand!
In the end I will definitely be making this one again. I already have other fabric lined up...maybe some like linen...and maybe a button placket down the front for a blousier look for work. Excited!
Monday, February 28, 2011
...What're You Wearing...Blue Suede Skirt
Thanks to leggings I finally got around to wearing it!
Styled with my fabric beaded string scarf which I snuck in just in time for for summer to start in Tampa!
Monday, February 21, 2011
DIY - Sweetheart hair Clip Tutorial Review
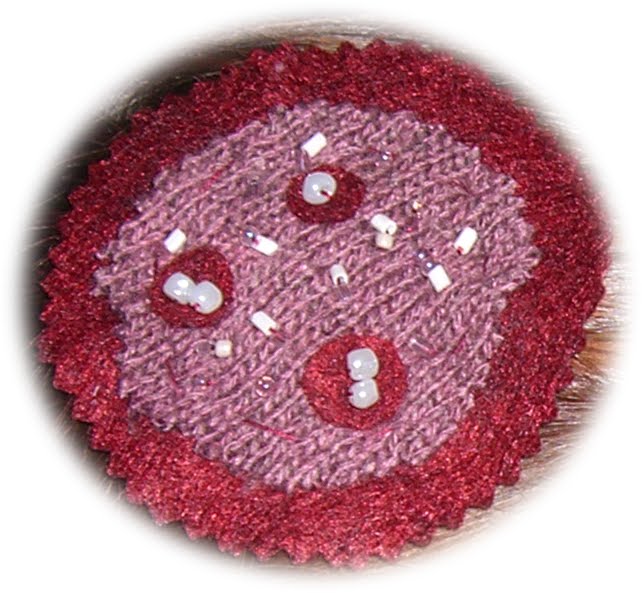
Tonight I wanted a quick project that I could wear right away. I love the look of Tea Rose Home's sweetheart hair clip with wool. It's crafty and vintage but right now at the same time. Here's my review:
Tutorial – Sweetheart Hair Clip with Wool by Tea Rose Home
Ease – 5/5
Difficulties – There aren't any measurements on the tutorial so I just eyeballed how big of a hair clip I wanted to wear, then cut 2 smaller sizes. The instructions offer a lot of freedom, which is good for me, but if you need direction, may be problematic.
Alterations - I didn't want a heart shape since Valentine's Day has passed so I did 2 versions - a rounded diamond shape and a circle. I didn't divert from the tutorial in terms of decorating the shapes because I really liked the pearls and beads.
Make it again? – Definitely, I need more colors! This is a great stash-buster. I used scraps of felt, pieces of a sweater and scraps from old curtains. I need a blue one, a green one, maybe a black and white one...oh the photos you're going to have to look at later....!
Saturday, February 19, 2011
...What're You Wearing...
Blue Poppy Dress. I made this dress last year and when I pulled it back out of my closet the other day I decided to slice 5" off the bottom for a more updated look. I've done this with a few of my old dresses and skirts lately. Apparently last year I was a total prude...or just hadn't learned to love my leggings yet :)
Saturday, February 12, 2011
Wednesday, February 9, 2011
Tuesday, February 8, 2011
...What're You Wearing...
This is my paparazzi kissy face. Don't make fun!
(shameless self promotion)This bracelet is listed on my Etsy.
Monday, February 7, 2011
Sunday, February 6, 2011
DIY - Girlfriend Wrap Tutorial Review

Today I had a free moment and decided to try out this Girlfriend Wrap Tutorial I came across a few days ago at The Longest Year. This would be perfect for sitting at my desk in the coldest part of the office all day long. To keep it from being so plain (it's just a big rectangle with a slice in it) I picked out a large plaid print and since it's blanket fleece it's incredibly cuddly. This can be found in my previous photos of all the crap I bought last weekend.

Check out the review:
Tutorial – Circle Beaded Necklace Tutorial by Martha Stewart
Ease – 5/5
Difficulties – This couldn't have been easier to make. It's a 36" x 48" piece of fleece with a 20" slice for your neck.
Alterations - I didn't change anything so much as add an embellishment. I stuck on 7 fabric flowers so it wouldn't look like i was wearing a blanket. One has already fallen off though so maybe I need to do something different. Maybe some swirly fabric flowers like I added to my mom's Christmas quilt...
Make it again? – Maybe. I think next time I would have to use a wider piece of fleece so more of my arms are covered. This mostly only keeps my back warm but I still like it. Also next time I would use a thinner fabric, like a jersey, so it would be more flowy and young.
*If I do any anything new to the wrap I'll definitely post some new photos.
This weekend I also learned to watercolor...
Thursday, February 3, 2011
DIY - Ruffle Cardi Re-Make
So I couldn't help myself and when cardigans went on sale at New York and Co a few months ago I bought two - a dusty pink and a black one. I'm not going to lie, the pink one is SOOOOO boring. It must have looked far more exciting under the store lights or something because once I got it home I decided that I was never ever going to wear it. Here's a few photos of me in my PJs :)

Not only is the color a little blah but the length is just now what I'm looking for right now. I bought this 1/2 yard of super soft jersey knit in a different shade of greyish-pink in hopes that it would contrast enough without being even more drab. Win! Originally I was going to cut the hem off the cardigan, add a 10" wide gathered strip of the jersey and sew the hem back to the bottom of the jersey. This would in some way hide the fact that I just added 1/2 yard a fabric to the garment. Yeah...maybe not.
Lately I'm obsessed with ruffles and other girly things that I had avoided for the first 14 years of my life. So I decided I would add a series of flounces to the bottom for a cute ruffle effect.
To create the flounce pieces I started with a rectangle. This rectangle is 1/2 the length of the cardigan hem (in this case it was 36" long). Only measure 1/2, this piece will be cut on the fold. Then draw vertical lines every 2 inches or so (I went a little crooked at first. don't eyeball it). Next slash those lines from one end almost to the other, creating a little hinge at the top. Lay some sheets of paper under the slashes and tape the pieces 1/2 inch apart at the end. The piece will make a curved accordion shape.

I wanted the ruffles to be shorter in the back and longer in the front/sides. The longest ruffles is 4" at center back and 7" at front. I wanted the middle ruffle to have a little more oomph so I added even more slashes to it.
Pin all the pieces with the narrowest end at the fold and cut 1 each. I cut mine all out with my rotary cutter to get a nice smooth edge that I wouldn't have to hem or straighten.

Line up the tops of each piece and pin. I had to pin every 2" of so since this knit was so slinky. Baste as close to the edge as possible. Pin the top of the flounce to the hem of the cardigan, right sides up. I did a zigzag stitch across the hem seam.

Sooo....my mom tells me I need to look at the camera and smile more in my photos...Here's a modeling session for you. Be nice!

Sleepy Wally!
Subscribe to:
Posts (Atom)

.jpg)
.jpg)