Tuesday, June 28, 2011
DIY - Maxi Skirt Tutorial
Bonus - This skirt doubles as a sundress!
Materials:
about 2 yards of knit fabric (sadface, this is my last bit of knit!)
2" wide elastic
ruler, chalk, scissors, thread, machine
First - Draw up your pattern piece. The front and back are the same so we only need to draft 1 piece. ***DON'T FORGET TO ADD 1/2" SEAM ALLOWANCE ALL AROUND***
1. Waist measurement - Wrap the measuring tape around you where you want your waistband to lay. Divide this by 4. This will be your top "waist" measurement.
2. Length - Measure from where your waistband will sit down to the floor. Do this under your bellybutton.
3. Sweep - This is how "flowy" the skirt will be at the hem. I did 20" for a great triangular effect that you can see better in the dress photo. I wouldn't go wider than 20" or you'll be dragging your side seams on the floor as you walk.
4. Elastic Waistband - Your waist measurement minus 8". This will ensure the elastic is stretching enough to hold up all this fabric. Test this before you sew by wrapping it around you. You don't want to cut off circulation to your legs! That would be really embarrassing.
Cut the 2 of these on fold so you have 2 perfectly symmetrical skirt halves.
Lay these halves right side together and pin the side seams together. Sew a straight seam down each side. Looks just like a skirt now!
Overlap and sew the ends of the elastic with a zigzag stitch.
Sew the elastic waistband to the waist of the skirt with a zigzag stitch. You can do this by sewing them right sides together then folding up the elastic, or you can just pin the fabric under the elastic right sides up. Stretch as you stitch.
All done! Unless you're not-lazy, in which case you would hem the skirt. I didn't find this necessary since the knit fabric doesn't fray.
I love this skirt/dress and will definitely make more once I replenish my stock of knit fabric. Let me know if you try it!
Store Update - Weekend Progress
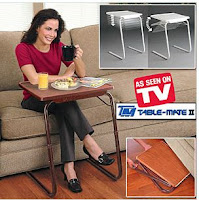
Sorry I didn't post yesterday. We had a teeny tiny fiasco with a plumbing leak and concrete and carpet and whatnot. All better now (minus the carpet). So I was pretty busy with the beads this weekend. I just popped in some movies (Adjustment Bureau and Red Riding Hood, good stuff) and worked from my couch each night. My back is killing me though! I think I need one of those tables that rolls over you lap on the couch...like this!
Table Mate $29.99
So here's some pieces that I photographed on my bed under my super duper bright lamp because there is just NO sunshine for the past 5 days. Sad. They will definitely need a real photoshoot before I list them. Let me know what you think :)
On a side note - I've been interested in finding some art/craft shows around my area (Central Florida). If you have any leads please let me know. I think it would fun (and stressful) to run a booth and I really need the challenge right now. I want this to feel more like a business more than hobby. The most frustrating thing is that jewelry is always a clsoed category because they are overflowing with booths of jewelry. Guess I need to book WAYYY in advance.
Thursday, June 23, 2011
Tuesday, June 21, 2011
Fixation - Ruffles, Dresses, Prints
These are my newest pins on my 'Style' board all found on Stylehive.com. I'm obsessing over ruffles on everything and prints are just necessary right now. I've been on a print fix for the past year or so where I have to be wearing at least one print in every outfit or I feel too plain. I think the ruffles are just an extension of that, as a 'texture' if that makes sense. I clicked through to find a couple casual dresses, fancy-shmancy dresses, and of course a wedding gown. You can check out my other pins here.
I <3 Pinterest so much right now. I really wasn't into it until I read a blog entry that I now of course can't find (should have pinned it) relating how the writer has had a hard time finding her personal style. To help her figure out where her tastes lie she started using pinterest to collect all the clothing, accessories and etc that caught her eye and realized that there was a pattern and that she already had a style, it was just hiding! So immediately I replied to the pinterest invite that had been sitting in my inbox for god knows how long and hopped over to anthropologie.com and have been hooked ever since. I now know that I am addicted to flowy, not too overly-hippy but pretty hippie, ethnic prints and tight pants. I installed the 'Pin it' button to my home and work computers (shhh) and whenever I find anything that catches my eye I can quickly save it and come back to it when I finally have time for a new project. So yes I <3 pinterest big time.
I <3 Pinterest so much right now. I really wasn't into it until I read a blog entry that I now of course can't find (should have pinned it) relating how the writer has had a hard time finding her personal style. To help her figure out where her tastes lie she started using pinterest to collect all the clothing, accessories and etc that caught her eye and realized that there was a pattern and that she already had a style, it was just hiding! So immediately I replied to the pinterest invite that had been sitting in my inbox for god knows how long and hopped over to anthropologie.com and have been hooked ever since. I now know that I am addicted to flowy, not too overly-hippy but pretty hippie, ethnic prints and tight pants. I installed the 'Pin it' button to my home and work computers (shhh) and whenever I find anything that catches my eye I can quickly save it and come back to it when I finally have time for a new project. So yes I <3 pinterest big time.
Monday, June 20, 2011
Win a Trip to Paris - Ends Today
Oh Happy Day is holding a giveaway where the winner gets a trip for 2 to Paris! Entries are only being expected until 11:59PM tonight. Hurry!
Enter Here
Sharing - Mail order Beads!
This weekend I finally recieved the beads for my next project! They only take 3 days but it always feels like a lifetime!
And here's what I got at the last day of Joann's Firefly sale
I'm going to be so busy this weekend.
PS I'm on Twitter now - god help me - you can find me @JessiSeling. I promise not to be too annoying throughout the day!
And here's what I got at the last day of Joann's Firefly sale
I'm going to be so busy this weekend.
PS I'm on Twitter now - god help me - you can find me @JessiSeling. I promise not to be too annoying throughout the day!
Sunday, June 19, 2011
Friday, June 17, 2011
DIY - Pencil Skirt (quick) Tutorial
This is a quick overview to putting together a quick and perfect and comfy and sexy knit pencil skirt. Unfortunately I couldn't give you a real tutorial because I am fresh out of knit fabric (tear!). I even had to cut up a Tshirt for lining fabric!
The pattern in pretty simple to draw up. Measure around waist, hips and thighs (where ever you want the hem to fall) and divide each of these by 4. The pattern piece is going to be used for the front and back and will be cut on the fold for perfectly symmetrical pieces. No need to add seam allowance as you want the knit pulled tightly over you.
For example:
My measurements were – waist 36”, hips 40”, thighs 32”. So when I drew my pattern piece I started with a straight vertical line measuring 18”. This is the length from my waist to midthigh. At the top of that line I drew a horizontal line measure 9” (1/4 waist) and at the bottom an 8” line (1/4 thighs). About 1/3 of the way from the top line I drew a 10” line for my hips. Now just connect the lines in a nicely curved manner. The straight vertical line is your center front (or back) and the sloping line is your side seam. Cut 2 of these from the fashion fabric and 2 from the lining. I lined mine because the knit was very thin and I was worried about feeling too exposed.
The waist band is just a rectangle the length of your ¼ waist measurement and 3” tall. Cut 2 of these from the fashion fabric and 2 from the lining.
Now that you’ve got this all cut out, time to sew! See the pink lines for stitching guidance. Instructions use ½” seam allowance.
Place the waistband fashion fabric right sides together and stitch down the side seams. Repeat for the lining.
Place the skirt fashion fabric right sides together and stitch down the side seams. Repeat for the lining.
Pin the waistband fashion fabric inside the waistband lining, right sides together, matching the side seams. Sew across the top of the waistband. Turn waistband right side out and press.
Pin the skirt fashion fabric inside the skirt lining, right sides together, matching the side seams. Sew around the hem of the skirt. Turn skirt right side out and press hem flat.
To finish, pin waistband to skirt, right sides together. Sew through all 4 layers. Finish seam with serger or leave raw, this is your only visible seam allowance.
See! Easy! I love this skirt. When I stock up on knits again I will definitely be re-creating this one.
**Notes**
*Next time I will make the waistband 1-2" smaller than the skirt because I definitely needed that belt to keep it from sliding down. Maybe some extra-wide elastic to go in the casing or instead of the waistband.
*Definitely press between steps! This creates nice straight and flat seams and everything will fit together better as you go.
Thursday, June 16, 2011
Wednesday, June 15, 2011
DIY - Advertising
To get this jewelry project off the ground I need to get my name out there. This is my step one in creating a brilliant ‘quit my job and work from home’ business! Ok this might be step 3 or 4 as I’ve already done the sourcing and prototypes, but shhhhhh.
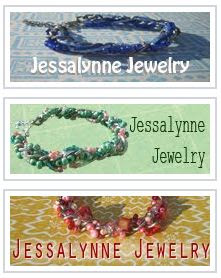
I’ve contacted a lot of design blogs that I follow regularly and love dearly about placing an ad, or button, on their sidebars. I’ve also asked a couple about hosting giveaways for my products. Very exciting stuff! Long story (not really) short, I have been spending my lunch breaks and evenings creating buttons from photos I already have of my bracelets. It was too overcast yesterday to attempt new photos so I had to make due. I actually love how they came out.
Design*Sponge did some great research on what types of buttons worked well and went wrong on their website. You can find it here (there are a lot of email hoops to jump through before they finally send it to you).
Here are the top few pointers I came away with:
2. DO make sure your ad looks like it belongs on the website - You want your ad to feel seamless with the posts or images, like it is an extension of the site.
5. DO pay attention to font choice for your ad text - Follow the site’s lead with your font choice.
8. DON’T use the same ad on every site you advertise one (if you’re advertising on multiple sites at the same time) - Chances are your target audience reads more than one design website (if you’ve heard of all of these sites, there’s a good chance your customers have too).
I know when I go to any site, the first thing that catches my eye is anything animated. So….I’m going to attempt to make an animated button showing some different merchandise. I think this will help draw readers to my ad and then to purchase my awesomely beautiful jewelry. Here are a couple tutorials on using photoshop to make this happen:
http://creativetechs.com/tipsblog/build-animated-gifs-in-photoshop/
http://www.theintermissionblog.com/2011/02/animated-blog-buttons-
tutorial.html
the 2nd one is a video and was very helpful to watch through before I even started. If I can get this to work I will post it in my own sidebar for you all to see. Wish me luck!
PS more jewelry photos coming tonight too!
Tuesday, June 7, 2011
Store Update - Even Newer Jewelry
I am dying coming up with cutesy little names for each piece but I am loving how wonderful my photos are turning out. Thank you direct sunlight :)
I've run out of chain for now so I've started on some earrings to round out the collection. I'm trying to use up the beading supplied I have before buying more but I already miss my chains so we'll see how long this lasts!
Click on the item's name to go to the online store. How do you like my lager/earring holder?
Luck Leaf Bracelet
Summer Elements Bracelet
Pink Ice Earrings
Luck Leaf Earrings
Spring Lime Earrings
Cobalt Night Earrings
Saturday, June 4, 2011
Store Update - New Jewelry Collection
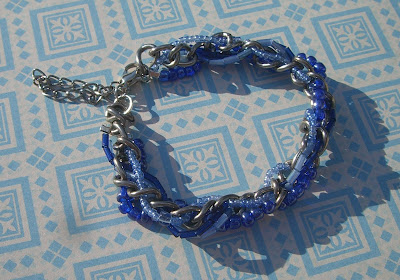
So I'm taking a break from sewing and going towards the more "instant-gratification" side of fashion - ACCESSORIES! Below are photos from Jessalynne's new jewelry collection titled Stained Glass. Yes this is semi-connected to my latest portfolio collection with the same name, in that it includes mostly jewel-tones. However, these pieces are for a variety of seasons and can be worn in a formal or casual setting. The czech glass beads and the silver chains are lightweight and the contrast of the materials is sure to catch everyone's eye.
In an effort to support this collection, a Kickstarter account has been set up. Please check out the page to see what it's all about. Basically, funds need to be raised in order to support the success of this collection. Only 9 pieces have been created but Jessalynne is very ambitious and hopes to expand the inventory immensely. I truly believe that these pieces will sell, sell, sell but first they need to be made and brought to the light of the public (i.e. online shoppers)! Kickstarter is a great program that allows people like me to post about specific projects and ask for contributions from every caring person with an internet connection.
So please check out the below photos, these pieces are currently available on SenseOfFashion.com/Jessalynne. I'll update you on Kickstarter's decision to aid in the production of this collection!
<3
Subscribe to:
Comments (Atom)


